
Pokemon Red, Blue, and Yellow In-Game Tiers - Reboot
Original lists done by Redew, Mekkah and atsync respectively:
Pokemon RBY In-game tiers - Mark I
Pokemon RBY In-game tiers - Mark II
Pokemon RBY In-Game Tiers - Mark III
Approved by DHR-107.
Welcome to the Pokémon Red, Blue and Yellow in-game tier list! The goal of this list is to rank every Pokémon in Kanto in one of the six tiers, from S to E, each vaguely determining its viability. The major factor under which each is ranked is efficiency; a Pokémon that is efficient provides faster and easier solutions to major battles, which include Gym Leaders, Elite Four members, and rival battles, than ones that are inefficient. Pokémon in higher ranks, such as S and A, are considered very efficient, while those in lower tiers, such as D and E, are considered not very efficient.
What are the tiers?
There are 6 tiers in this list:
Pokémon are ranked under the following five factors:
-This list is generally very different from the older three lists above. I, with the help of a few others, tiered the mons almost completely from scratch instead of being based off of the old lists. As such, please try to follow the newer rules.
-Generally, this list will be assuming you run with four Pokemon. This is because teams with more than four members will likely be significantly underleveled for the Elite Four. This also means HMs shouldn't be an issue, as you will have two slots to use HMs with, and the most notable ones (Cut and Fly) can be covered by DUX the traded Farfetch'd.
-All X Items, including X Accuracy, are banned. This is because a player can use X Accuracy to give the One-Hit KO/OHKO moves like Fissure, Horn Drill and Guillotine perfect accuracy and thus destroy the Major Battles with ease. The other X Items aren't problematic, but are banned for consistency's sake. If we kept X Accuracy unbanned, the list would centralize around all Pokemon that learn an OHKO move.
-You are free to sequence break, but if a Pokemon requires you to beat a Gym Leader with underleveled Pokemon in order to be used as efficiently as possible, it may be knocked down a bit. In addition, you are still expected to test Erika and Lt. Surge at like-levels (say, 2 levels above their ace at max), as pretty much everything will beat those when you fight them as the last Gym Leaders.
Other Notes
Original lists done by Redew, Mekkah and atsync respectively:
Pokemon RBY In-game tiers - Mark I
Pokemon RBY In-game tiers - Mark II
Pokemon RBY In-Game Tiers - Mark III
Approved by DHR-107.
Welcome to the Pokémon Red, Blue and Yellow in-game tier list! The goal of this list is to rank every Pokémon in Kanto in one of the six tiers, from S to E, each vaguely determining its viability. The major factor under which each is ranked is efficiency; a Pokémon that is efficient provides faster and easier solutions to major battles, which include Gym Leaders, Elite Four members, and rival battles, than ones that are inefficient. Pokémon in higher ranks, such as S and A, are considered very efficient, while those in lower tiers, such as D and E, are considered not very efficient.
What are the tiers?
There are 6 tiers in this list:
- S-tier
- A-tier
- B-tier
- C-tier
- D-tier
- E-tier
Pokémon are ranked under the following five factors:
- Availability: This is how early a Pokémon becomes available in the game and how hard it is to find (read: encounter rate). Does it require significant backtracking, require HM moves, or just have a low encounter rate? This includes backtracking to catch the legendary birds, as aside from Moltres they are located in very out-of-the-way locations.
- Typing: A Pokémon's typing can be of great importance for an efficient playthrough. How do the typing's matchups work against the entire game? If a Pokémon has better typing, it is often considered for a higher rank.
- Stats: A Pokémon's stat distribution is crucial for its success. Does the Pokémon have a stat distribution that complements its movepool and typing? If a Pokémon has a stat distribution that favors both its typing and movepool, it will often be higher on the tier list. Pokemon with greater Speed will often be ranked higher, as they will also land critical hits more often.
- Movepool: A Pokémon's movepool (both level-up and TM/HM) is crucial. What moves does the Pokémon naturally get and can possibly obtain? Unlike with past games, In RBY, TMs have significant opportunity cost because they are one-use, and Pokemon will be penalized harshly if they are reliant on multiple TMs to function.
- Major Battles: Major battles consist of Gym Leaders, the Elite 4, and rival battles. How does the Pokémon contribute to these battles? A Pokémon that contributes to many major battles will often be seen higher than those that do not.
-This list is generally very different from the older three lists above. I, with the help of a few others, tiered the mons almost completely from scratch instead of being based off of the old lists. As such, please try to follow the newer rules.
-Generally, this list will be assuming you run with four Pokemon. This is because teams with more than four members will likely be significantly underleveled for the Elite Four. This also means HMs shouldn't be an issue, as you will have two slots to use HMs with, and the most notable ones (Cut and Fly) can be covered by DUX the traded Farfetch'd.
-All X Items, including X Accuracy, are banned. This is because a player can use X Accuracy to give the One-Hit KO/OHKO moves like Fissure, Horn Drill and Guillotine perfect accuracy and thus destroy the Major Battles with ease. The other X Items aren't problematic, but are banned for consistency's sake. If we kept X Accuracy unbanned, the list would centralize around all Pokemon that learn an OHKO move.
-You are free to sequence break, but if a Pokemon requires you to beat a Gym Leader with underleveled Pokemon in order to be used as efficiently as possible, it may be knocked down a bit. In addition, you are still expected to test Erika and Lt. Surge at like-levels (say, 2 levels above their ace at max), as pretty much everything will beat those when you fight them as the last Gym Leaders.
Mechanic glitches are being considered for this list, though overworld glitches (such as MissingNo.) are not. The main mechanic glitches worth noting are the following:
- All 100% accuracy moves have a 1/256 chance of missing in RBY without additional modifiers. Swift in Japanese versions also can miss.
- Hyper Beam won't recharge if it KOs an opponent.
- Leech Seed and Toxic both use the same damage algorithm. If the target of Leech Seed is also under the effect of Toxic (or was under that effect and healed itself with Rest), Leech Seed damage and healing increase each turn.
- Pokemon with high base Speed land critical hits more often. If a Pokemon uses a high-critical hit move, it is almost guaranteed to critical hit since the critical hit ratio is multiplied by eight.
- Related to the above, critical hits ignore your stat boosts. For example, a +2 Attack critical hit Slash deals the same as Slash landing a critical hit without Attack boosts.
- Counter works only when hit by Normal and Fighting-type moves (and is triggered by healing items).
- Body Slam cannot paralyze Normal types.
- Seismic Toss hits Ghost-types. Similarly, Night Shade hits Normal and Psychic types.
- Freeze is permanent and is only removed with Haze or being hit by a Fire-type move that can cause a burn (or use a healing item)
- The game will misinform you about type matchups. For example, Fighting moves hit Pidgey neutrally, but the game will tell you it was not very effective. This is cause the game doesn't see the second type that makes it neutral
- Psychic-types are immune to Lick (it's the only offensive Ghost-type move other than Night Shade)
- Wrap, Fire Spin, and co. will prevent a Pokemon from using moves till it frees itself from the effects.
- Waking up from sleep is counted as full turn, thus a Pokemon does not use a move when it wakes up.
- Sleep lasts 1-7 turns in RBY and this counter is not reset upon switching out, However, once you get the Poke Flute, Sleep mostly becomes a non-issue as it can be reused infinitely in battle.
- Focus Energy actually decreases the chance of landing critical hits.
Yellow Differences
In Yellow, you are forced into having Pikachu as a starter. The other starters can be obtained as follows:
Encounter Differences
In Yellow, you are forced into having Pikachu as a starter. The other starters can be obtained as follows:
- Bulbasaur is found in the house to the west of the Cerulean City Pokemon Center. Here, a lady offers you a Bulbasaur that she has nursed back to health if your Pikachu is in a happy mood. This can be done easily by using Potions on Pikachu at full health; while the game says it has no effect, it actually raises Pikachu's happiness via a glitch and thus can be used to easily get Bulbasaur.
- Charmander is found north of Nugget Bridge - speak to the trainer on the raised platform in the north-west corner of Route 25 (past the Team Rocket Grunt to the left, near some ledges). Claiming that he is a bad trainer, he'll offer you Charmander.
- Squirtle can be obtained once you beat Lt Surge at the Vermilion Gym. To do so, talk to Officer Jenny in the middle of town (to the left of the Poke Mart) to get Squirtle. Most notably, Charizard can learn HM02 Fly in Yellow, unlike in Red and Blue.
- Your rival starts off with an Eevee that will evolve differently depending on your battles with him. If you win the battle at the lab and the battle on Route 22, he will get Jolteon. If you win the battle at the lab but not the battle at Route 22, he will get a Flareon. If you lose both battles, he will get a Vaporeon.
- Gym Leaders have different teams to reflect the Pokemon they had in the anime and their levels are significantly buffed, most notably from Koga onward.
- Jessie and James appear with Ekans, Koffing, and Meowth as recurring bosses throughout Yellow. They appear at Mt. Moon, Rocket Hideout, Pokémon Tower, and Silph Co., with their Pokemon save for Meowth evolving at Pokemon Tower.
Encounter Differences
- Raichu is only available in Red and Blue. In Yellow, your starter Pikachu cannot evolve into Raichu, but Pikachu has a slightly buffed moveset from Red and Blue to compensate for this.
- Electabuzz and the Ekans line are only available in Red.
- Magmar and the Meowth line are only available in Blue.
- Jynx, the Weedle line and the Koffing line are only available in Red and Blue.
- Scyther, the Oddish line, the Mankey line and the Growlithe line are only in Red and Yellow.
- Pinsir, the Sandshrew line, the Bellsprout line and the Vulpix line are only in Blue and Yellow.
- Porygon costs 9,999 coins in Red and Yellow, but only 6,500 Coins in Blue. Notably, Porygon is the only Pokemon who is Game Corner exclusive.
- Abra costs 180 Coins in Red, 120 Coins in Blue, and 230 Coins in Yellow.
- Scyther costs 5,500 Coins in Red and 6,500 Coins in Yellow.
- Pinsir costs 2,500 Coins in Blue and 6,500 Coins in Yellow.
- Clefairy costs 500 Coins in Red and 750 Coins in Blue.
- Dratini costs 2,800 Coins in Red and 2,500 Coins in Blue.
- Vulpix costs 1,000 Coins, but is only in Yellow.
- Wigglytuff costs 2,680 Coins, but is only in Yellow.
- Nidorina costs 1,200 Coins, but is only in Red. Similarly, Nidorino costs 1,200 Coins but is only in Blue.
Info is borrowed from the "[RBY] Critical Hits in RBY" thread here.
Please note that results are rounded to the nearest two decimal places, and only fully evolved Pokémon are included.
Pokémon - Base Speed - Crit Rate
Electrode - 140 - 27.34%
Aerodactyl - 130 - 25.39%
Jolteon - 130 - 25.39%
Mewtwo - 130 - 25.39%
Alakazam - 120 - 23.44%
Dugtrio - 120 - 23.44%
Persian - 115 - 22.46%
Starmie - 115 - 22.46%
Gengar - 110 - 21.48%
Tauros - 110 - 21.48%
Electabuzz - 105 - 20.50%
Rapidash - 105 - 20.50%
Scyther - 105 - 20.50%
Charizard - 100 - 19.53%
Dodrio - 100 - 19.53%
Fearow - 100 - 19.53%
Mew - 100 - 19.53%
Ninetales - 100 - 19.53%
Raichu - 100 - 19.53%
Tentacruel - 100 - 19.53%
Zapdos - 100 - 19.53%
Raticate - 97 - 18.95%
Jynx - 95 - 18.55%
Primeape - 95 - 18.55%
Magmar - 93 - 18.16%
Pidgeot - 91 - 17.77%
Golbat - 90 - 17.59%
Kangaskhan - 90 - 17.59%
Moltres - 90 - 17.59%
Mr. Mime - 90 - 17.59%
Venomoth - 90 - 17.59%
Hitmonlee - 87 - 16.99%
Articuno - 85 - 16.60%
Golduck - 85 - 16.60%
Nidoking - 85 - 16.60%
Pinsir - 85 - 16.60%
Seadra - 85 - 16.60%
Gyarados - 81 - 15.82%
Arbok - 80 - 15.63%
Dragonite - 80 - 15.63%
Kabutops - 80 - 15.63%
Venusaur - 80 - 15.63%
Blastoise - 78 - 15.23%
Hitmonchan - 76 - 14.84%
Nidoqueen - 76 - 14.84%
Beedrill - 75 - 14.65%
Kingler - 75 - 14.65%
Butterfree - 70 - 13.67%
Cloyster - 70 - 13.67%
Dewgong - 70 - 13.67%
Magneton - 70 - 13.67%
Onix - 70 - 13.67%
Poliwrath - 70 - 13.67%
Victreebel - 70 - 13.67%
Seaking - 68 - 13.28%
Hypno - 67 - 13.09%
Flareon - 65 - 12.70%
Sandslash - 65 - 12.70%
Vaporeon - 65 - 12.70%
Clefable - 60 - 11.71%
Farfetch'd - 60 - 11.71%
Lapras - 60 - 11.71%
Tangela - 60 - 11.71%
Weezing - 60 - 11.71%
Exeggutor - 55 - 10.74%
Machamp - 55 - 10.74%
Omastar - 55 - 10.74%
Chansey - 50 - 9.77%
Muk - 50 - 9.77%
Vileplume - 50 - 9.77%
Ditto - 48 - 9.38%
Golem - 45 - 8.79%
Marowak - 45 - 8.79%
Wigglytuff - 45 - 8.79%
Porygon - 45 - 7.81%
Rhydon - 45 - 7.81%
Lickitung - 30 - 5.86%
Parasect - 30 - 5.86%
Slowbro - 30 - 5.86%
Snorlax - 30 - 5.86%
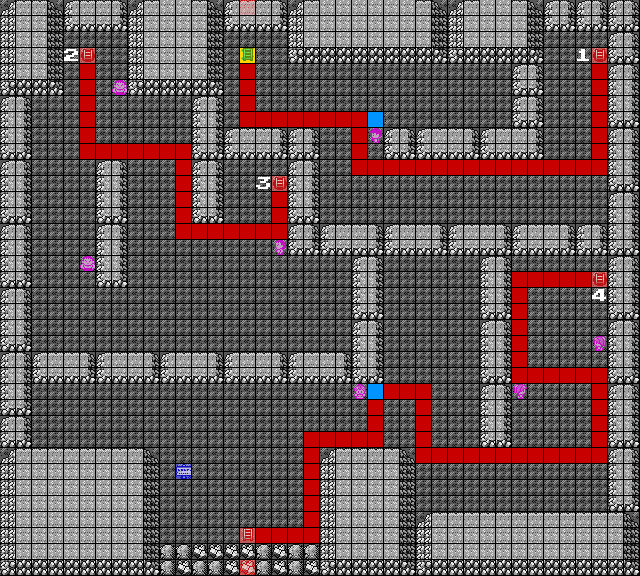
This map is borrowed from the Pokémon Speedruns Wiki here.
Note that HM05 Flash is given to you near the Viridian City gate for catching 10 different species of Pokemon. Travel through Diglett's Cave near Vermilion City to reach Oak's Aide to get HM05 Flash, though you will need a Pokemon that has learned HM01 Cut to access the gate. HM05 Flash will let you see in Rock Tunnel easier.
Key:
Red Square = Bike Path
Yellow Square = Use Repel
Blue Square = Trainer Battle
So, in other words, you only need three Repels for Rock Tunnel and there are only five required trainer battles if you want to get through Rock Tunnel as painlessly as possible.
1F:
2F:
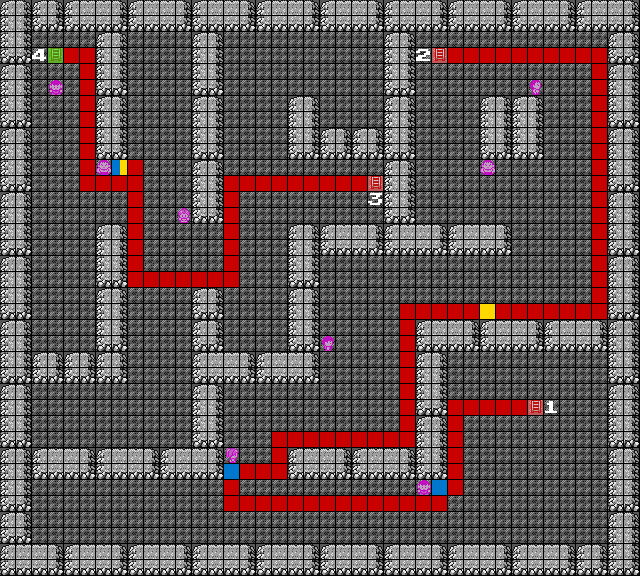
Other Notes
- Most of the Pokemon from the old lists were merged into one ranking here. That is why you don't see separate rankings for Pikachu or the Kanto starters in Yellow. The only two tiering differences that are below are Farfetch'd (available on Routes 12 and 13 in Yellow as opposed to a trade in Red and Blue) and Psyduck (available post-Surf on Route 6 in Yellow as opposed to Seafoam Islands and various places with the Super Rod).
- Psychic types in general are broken in RBY, and thus most of them will be placed in the higher tiers. Psychic types essentially have no weaknesses, as Bug is mostly nonexistent and Psychic types are immune to Ghost-moves save for Night Shade.
- Normal types are similar to Psychic types in that most of them can abuse the no-recharge-if-it-KOs Hyper Beam. Slash is in a similar boat (moreso for any type really) because critical hit rate is based off Speed, but only Persian and DUX the traded Farfetch'd can abuse STAB Slash.
- TMs in RBY are very odd, but their location list can be found here: https://www.smogon.com/ingame/guides/rby_tms. Note both the Swords Dance and Earthquake TMs are found in Silph Co in particular, so it's recommended to try and get them as soon as possible (while avoiding as many Team Rocket Grunts if it's necessary).
Last edited:


 140, 70, 45, 50, 45
 160, 110, 65, 65, 30
 95, 70, 73, 85, 60
 95, 125, 79, 100, 81